
Authentication Project: Secret Page App Part One (Set up & Create User Model)


So far we only write the RESTful routes to send request and redirect to the related page, but we haven't do anything about authentication.

If we can sign up, login, and log out, it will make our app more meaningful. Therefore, the course shows us how to create a secret page app, which will allow us to sign up, login to a secret page, and logout.

Since it requires so many pieces, I will divided this project into three parts: set up & create user model, sign up, and login/logout. In this post, I am going to show all the set up process.

Set Up


Step One: Install packages

The first thing we are going to do to create a folder "Auth", and inside of "Auth", we need to create another folder "AuthDemo". Then we cd (change directory) to "AuthDemo".

Now we can set up the actual application structure by installing a few packages: passport, passport-local, passport-local-mongoose, mongoose, express, ejs, body-parser, and express-session.


Step Two: Require all the packages

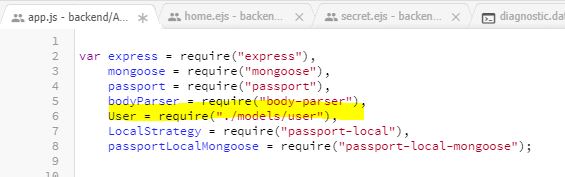
After installation is done, we need to create "app.js" file inside of the "AuthDemo" folder. And in the file, we need to require all the packages, connect to the mongodb, and set up some basic configuration.


Step Three: Add first two routes: home and secret page

We will write our first Get route "/" which will render to the home page. At the same time, we need to create a new folder "views", and inside "views", we add "home.ejs" file. We can write a simple h1 text "Homepage" in the file.


 We also need to write another route to render to the "secret" page. And we also need to create a "secret.ejs" file inside of "views". In this file, I write some secret words.

Create User Model

Step One: Define user schema

We need to create another folder "models" inside "AuthDemo". Inside the "models", we touch "user.js" file.

In the "user.js", we will require mongoose, and define user schema which contains two different parts: username and password. Both of them are string.  Then we are going to add user schema into the mongoose model.


Then, we back to the "app.js" file, and we require the user.


Step Two: Add passport local mongoose

Inside the "user.js", we will add in passport local mongoose to our user model.


Step Three: Set passport up

Back to "app.js", we need to set passport configuration up, so it will work in our application.


Step Four: Add express-session

In the "app.js", we need to set up express-session. What we need to do is run it as a function and pass in some arguments.

In the function, we have to pass in three options in order for it to work with passport. Those options are: secret, resave and save uninitialized.


The "secret" can be anything at all. You can pick your own words. It will be used to encode and decode the sessions. Therefore, we are not going to be store data inside the session as it normally looks as readable data. 

Then, set the rest two options to be "false". Those are the required, no need to explain.

Step Five: Set up serialize and deserialize user

The last step of creating user model is to set up two more things: user serialize and user deserialize.

Those two methods are really important to passport. They are responsible for reading the session, taking the data from the session which is encoded and unencoding it. This is the deserialize.

And then encoding it, serializing it and putting it back in the session which is what serialize user does.


Comments

Popular posts from this blog

Intermediate Express.js: How To Add Styles & Partials in EJS File?

So far, we only have simple HTML tags and ejs tags in each ejs file. Every template page has no style at all. And the basic HTML header and footer are also missing. Today, I learned how to add styles and partials in ejs file. Link Style Step One: Touch a Separate CSS file I create a new directory "Style" under the "EJSDemo" directory, then I add a new CSS file "app.css" inside "Style" folder. Step Two: Add app.use(express.static()) in the app.js I add app.use(express.static("style")) in the "app.js". This will tell Express.js to serve the content of "Style" directory. Step Three: Write styles in CSS file I simple give body an orange background color and set text color to be grey. Step Four: Link to CSS file in the EJS file I just add <link> tag to link the "app.css" file on the top of the h1 tag in each ejs template. As the result, when I run the app and...

My Story: A Mommy Start To Learn Code From Zero

From Google Image I am not a programmer, and I thought I would never become one. Everytime I see someone is coding, I think he or she must be very talent.  For me, coding is a very difficult subject to learn. Not only the language has so many rules, but also the logical reasoning behind the language is complex.  In my graduated school, I knew many friends who didn't have any coding background, but they are doing programmer or developer jobs now. Some of them went to school to study coding, and some of them  learned to code by themselves. Their stories are so impressive.  I wasn't ready to learn code until I finished my first Chinese book "留学,我的青春呀!" recently. I always want to be a writer and write my own book. I started writing blog three years ago, and I updated my post two to three times every week. As I enjoyed writing , I started to get some followers, likes, and good comments on my blog. Then, I decided to plan my first book. My First...

Three Most Common HTML Form Elements You Should Know

When I visited the Facebook page at the first time, it required me to sign up. Therefore, I completed the sign up form to create my new account. The form is very simple to fill in because it only asks for very common information such as full name, phone number, new password, birthday, and gender. It only took me one or two minutes to finish the form. Not only Social media sites require us to sign up first before we post anything, but many business or eCommerce sites also ask us to create new account before we take any action. For example, when I go to the Origins skin care site, it will pop up a email sign up form window. To encourage new customers to sign up, it gives a 15% off for the first order. It is definitely an attractive call-to-action message. Anyway, if your website requires users to sign up, you need to know how to create a HTML form. Yesterday, I just learned how to build a simple HTML form from Udemy course. And it is not that hard. All you need to kno...