Bootstrap: Jumbotron & Forms

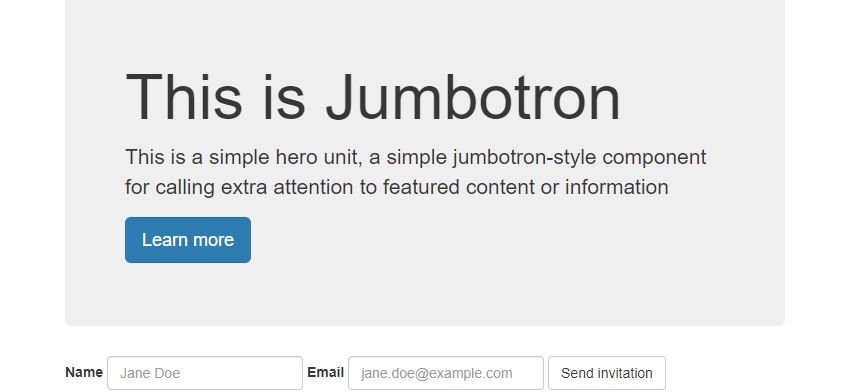
If you want to make your message outstanding on the web page, Jumbotron can be a good style choice. Jumbotron is a lightweight, flexible component that can optionally extend the entire viewport to showcase key content on your site. (From Bootstrap Components-Jumbotron)


I would like to try this component on my page, so I create the HTML page and apply the Jumbotron code in the body part. I change the text "Hello, World!" to "This is Jumbotron" and also put its definition in the <p> element.
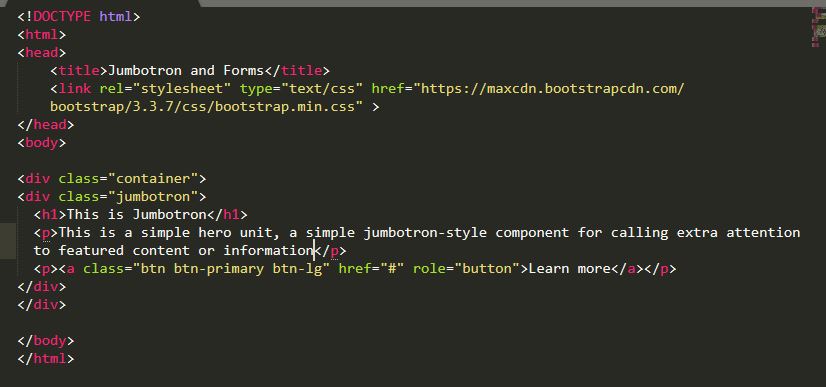

If we want the whole part to be center of the page, the instructor told us a quick way to do that is adding a "container" outside the jumbotron code.


The instructor also recommended some common forms on Bootstrap. I prefer the inline form because it is very short and simple. I apply the inline form code under the Jumbotron code. The class value "form-group" will group that input, so it can leave some space between each input.
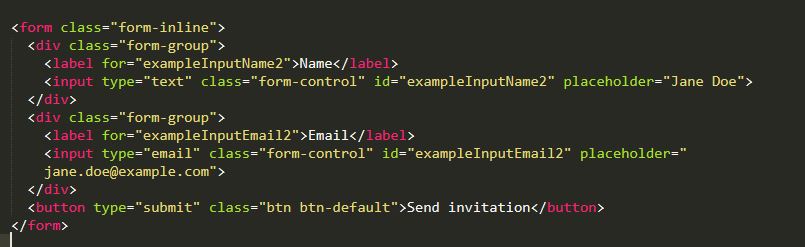


As a result, we can see all the input are in one line. There are some spaces between "Name" and "Email" and "Send invitation".


The final page looks like:


Comments

Popular posts from this blog

GIT Study Note: Six Git Commands You Should Know!

What is Git? According to Git website , Git is a free and open source distributed version control system designed to handle everything from small to very large projects with speed and efficiency. Basically, we can use Git to track all of changes and revert them back if we made mistakes. The version control system is a way for us to work with different versions of our code, so that we can save different features and make notes as we progress. It is also very useful for team collaboration. Six Git Command You Should Know 1. Git Init In our server, we need to create a "Git" directory and inside of "Git", we make another direcory "git_inro". Then, we add a file "app,js" in the "git_intro" folder. The first thing we need to run is "git init" . When we run git init, it will make a directory which is hidden called ".git". Wherever I run that git init command, it's going to track all of our changes. ...

Intermediate Express.Js: Write Conditions and Loops In The EJS (study note)

We continue to use the app.js which we have build to be the study example. In the last post, we only add a simple EJS tag <%= thingVar %> inside h1 tag. This will match the "thing" to any "thing" request from the user. If Statement Today, the course shows us to write a simple if statement in the EJS file. I learn to apply it to my own app. In the if statement, if users send"/wantto/workout" request, the page will show a new content "Good Idea!". We wrote the if statement in the "diet.ejs" file, and we add "<% %>" tags around the code. We have to wrap every line of JavaScript anytime JavaScript starts and ends. Moreover, you may see there are two types of ejs tags here: <%= %> The one with equal sign. According to the course, when we add equal sign, the value that is returned inside of the tag will be rendered to the HTML page. it will be added to the HTML. For example, if we write ...

Intermediate Express.js: How To Render HTML From A EJS File?

The Express.js apps we have developed so far are just simply getting requests from users and sending matched message back to them. However, it is not what we want in the real web application. In most case, we want to send back a relevant web page when our app receives request from user. In order to do that, we need to npm install ejs file in the Express, create HTML page in the ejs file, and render HTMl from the ejs file. I know it sounds confuse now. I am going to explain more details in the example. EJS stands for embedded JavaScript. It lets us embed JavaScript code variables if statements loops inside of HTML. How to render HTML from a EJS file? Step One: Create a HTML page in EJS file Firstly, in our server, we create a folder named "EJSDemo". In this folder, we touch two files, one is "app.js", and the other one is "home.ejs". We are going to write a simple HTML code in the "home.ejs" file. The instructor create a dog page,...