In the last post, I shared my study note about three basic CSS selectors. Even though I wrote an example under each selector, it still may not enough to explain how those selectors make the effect.
Therefore, I am going to explain more detail about how to use those CSS selectors in a simple project.
In this project, I will create a short To Do List and then apply element selector, ID selector and class selector to style the list.
Step One: Create HTML page
As I mentioned before, the first step is always to create HTML page. Without a page, we can't do any CSS work. It is just like we should have a cake ready before to put cream and fruit on it.
Here is the To Do List HTML part:


Step Two: Use Element/ID/Class selectors in the CSS file.
Element Selector:
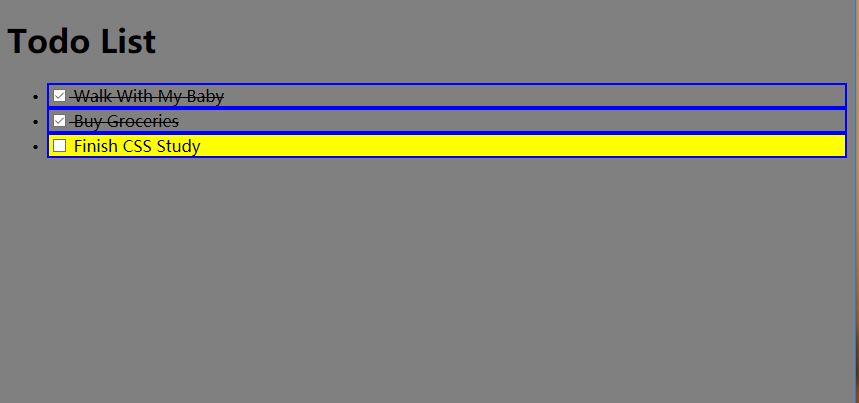
Firstly, I want to make the web page background to be grey. Since the whole body of the page will be grey, I will use Element selector: body { background: grey;}. As the result, the web page background turns into grey color.
I also want to add a blue border to each list text, so I write li { border: 2px solid blue;}. To be clear, 2px refers to the border width, solid refers to the border style, and blue refer to the border color.


Therefore, I am going to explain more detail about how to use those CSS selectors in a simple project.
In this project, I will create a short To Do List and then apply element selector, ID selector and class selector to style the list.
Step One: Create HTML page
As I mentioned before, the first step is always to create HTML page. Without a page, we can't do any CSS work. It is just like we should have a cake ready before to put cream and fruit on it.
Here is the To Do List HTML part:
It turns out a simple black and white web page.

Element Selector:
Firstly, I want to make the web page background to be grey. Since the whole body of the page will be grey, I will use Element selector: body { background: grey;}. As the result, the web page background turns into grey color.
I also want to add a blue border to each list text, so I write li { border: 2px solid blue;}. To be clear, 2px refers to the border width, solid refers to the border style, and blue refer to the border color.
ID Selector:
Since the ID selector can be only used once per page, I want to make a yellow background to the last list content which is "Finish CSS Study". This is the most important thing in the day. I definitely don't want to forget it.
I add the id="special" inside the <li> tag on the HTML part. By the way, you don't have to name the id as "special", you can name anything you want. In the CSS part, I write the ID selector: #special { background: yellow;}.
Keep in mind, if you use other id name, in the CSS part, you need to write #youridname { property: value;}
Class Selector:
Since I already finished the first two things, I want to cross out both of them. It is time to use class selector.
Just like what I did in the ID selector, I need to add "class" attribute in the HTML. I set the class value as "completed" since I already completed them.

Then, I go back to the CSS part to write the class selector: .completed { text-decoration: line-through;}. Don't forget the DOT before the attribute value.
The final page will look like:
Comments
Post a Comment