Now we have learned the basic HTML elements and attributes. The first assignment from the course is to write a simple web page, which requires to include: Header, text, list, image, and hyperlink.
Before we write any code, we need to know how to combine all the elements into an entire HTML page.


Before we write any code, we need to know how to combine all the elements into an entire HTML page.
According to MDN Web Doc, it states that a HTML page must includes the following elements:
<!DOCTYPE html>: It is the shortest string of characters that counts as a valid doctype.<html></html>: This element wraps all the content on the entire page, and is sometimes known as the root element.<head></head>: This element acts as a container for all the stuff you want to include on the HTML page that isn't the content you are showing to your page's viewers. This includes things like keywords and a page description that you want to appear in search results.<meta charset="utf-8">: This element sets the character set your document should use to UTF-8, which includes most characters from the vast majority of human written languages.<title></title>: This sets the title of your page, which is the title that appears in the browser tab the page is loaded in, and is used to describe the page when you bookmark/favorite it.<body></body>: This contains all the content that you want to show to web users when they visit your page, whether that's text, images, videos, games, playable audio tracks, or whatever else. (This list is from Get Started to Learn HTML "Anatomy of a HTML Document")
I am going to create a very simple fashion style page, which includes a page title, a picture, a short list, and hyperlinks. My steps are:
- Open Sublime Text, create a new file and save as "Fashion Style webpage.html". We have to put ".html" in the document name, so you can run your code and check the web page on browser.
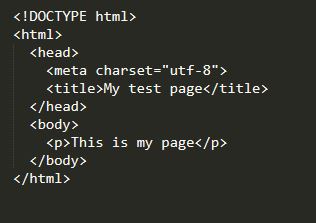
- Type "html" and click "Tab" on your keyboard, the html document will automatically show
- In the <title></title> element, write the page title "Fashion Style"
- Find the <body></body> element, and start write the page content.
- Start to build a simple paragraph use <p></p>, type some content inside the element.
- Insert an image by using the <img src=""> tag. Find an fashion image from Google, and copy the image link and paste in the tag.
- Type <h4></h4> or any other h tag to determine your subheading size. Then write the a subheading text inside the tag.
- Use <ul></ul>(unordered list) to create a short fashion brand list
- Inside <ul> tag, write the brand name and add hyperlink attributes<a href=""></a> inside <li></li> (list item)
- In the hyperlink attribute, copy the web address of the brand homepage and paste in the attribute tag.
- Start a new line by using block-level tag <p></p> to make a call-to-action link. Inside the tag, write the call-to-action content "make sure to check on Dealmoon for good deals". Dealmoon is a publisher website, so I want to drive users to check that website out. So, I copy the Dealmoon homepage web address and paste it in the <a href=""> tag.
- Test the result

Once I finish the html part, I open the web page on Google Chrome, and it shows the exactly the way I want!

I know this page looks very simple, but it is a good start!
Comments
Post a Comment